If you intend to do any editing of the template of your New Blogger template, a wise thing to do is first backup your current template PLUS edit your Page Elements one by one, pasting the content into Notepad files and saving them together with your backup template. This has been made very easy for you. Just sign into the Dashboard, and in the section for the relevant blog, click LAYOUT, then click the TEMPLATE tab. Click the EDIT HTML sub-tab below that. This will open your template editor window where you can make changes to your template, but before you make any changes to the template, it is always wise to BACKUP the template first.
To backup the template, click the "Download full template" link and save the backup template into a suitable folder with a filename like blognameDate (substitude blogname with the name of your blog, plus any information that will help you pick out the template you want such as information on changes you plan to make, etc.) or other system of naming which will enable you to identify the backup template easily.
If you have been adding Page Elements, you should also edit the Page Elements one by one and copy its content into Notepad files, save them into the same folder that you save your backup template. This is because when you upload your backup template, there is a possibility that some Page Elements will not be saved. If you have backed up these Page Elements, all you need to do is to put them back.
Backing up Page Elements have been described in more details in Back New Blogger Page Elements (click BACK button to get back to this page).
After you have done that, you can edit the template in the template editor window with peace of mind, knowing if you mess it up, you can just upload your backup template plus put back in any Page Elements that got deleted in the process, and you will be back to your former state.
Regarding editing of the template, how you do it will depend on what you want to do. The simplest would be to edit the template without expanding the widget templates. The template will be easiest to read as it leave out a lot of parts of the template. However, sometimes this is not good enough, you will have to tick the "Expand widget template" to get access to the rest of the template. Whichever way you do will depend on what you want done. Follow the instruction.
Showing posts with label template. Show all posts
Showing posts with label template. Show all posts
Tuesday, March 13, 2007


Thursday, February 01, 2007
Backing up current template PLUS Page Elements and changing New Blogger Template
One of the most important thing for you to do after you have made customization and other changes to your blog is to BACKUP the template PLUS edit your Page Elements one by one and copy the content into Notepad files and saving them together with your backup templates. Backing up Page Elements are decribed in greater details in Backup New Blogger Page Elements (click BACK button to get back to this page).
Backing up New Blogger templates has been made very easy. Only problem is some of your Page Elements may be deleted when you put back your backup or new template. That is why it is important for you to read the above post.
For backing up New Blogger template, all you need to do is to sign into your New Blogger account, click "Layout" in the relevant section of the list of blogs, click the TEMPLATE > EDIT HTML tabs. This will open the template editor window and you can make changes to the template if that is what you want to do. However, as mentioned above, it is important to backup the current template first before making changes or changing to new template.
To backup the template, click "Download full template" and save it with an easily identifiable filename like DummiesGuide 1 feb 2007 plus any other information to identify the backup template such as changes you plan to make, ect., and save it in a suitable folder. Make full use of the ability of using long file names. If you use the old method of backing up template by copy-pasting into Notepad, make sure that you expand the template widget first.
Note "PLUS Page Elements" above. Reason is, when you change a New Blogger template, some Page Elements (widgets) may be deleted. For more information on backing up Page Elements, refer to Backup Page Elements (widgets) (click BACK button to get back to this page)
If you want to change the current template to a standard Blogger template, click the TEMPLATE > PICK NEW TEMPLATE tabs and select a suitable template, then click "Save template". If you have done customization, it is likely you will get a warning that some Page Elements (widgets) are about to be erased, and whether you want to proceed.
If none of the standard templates appeal to you, there are other templates made or modified by others. This template uses Ramani's modification of Douglas Bowman Minima template (see 3 column template for the New Blogger (formerly beta). I choosed this template mainly because it fits in nicely for those using the 800x600 screen resolution which still represents 5 - 20% of the readers (this statistics is obtained by installing statcounter (those using the New Blogger template will install the statcounter by using "Add a Page Element" instead. Readers with larger screen will see empty columns on either side of the screen. Also there is this readability study which influenced me: What is the best template to use for my blog. See No. 2. However, template choice is a very personal matter, and people value different things, and also have different kind of visitors. You chose the template you prefer.
If you want to rid of those empty columns, there are other templates to consider. Use the standard Blogger stretched templates. Also, see New Blogger 3 column template modified by Stavanger of Blogcrowd Forum, More New Blogger (formerly beta) templates modified by Stavanger and New Blogger (formerly beta) template for posting large photos, tables, scroll boxes, etc.. To use these templates, get to the template editor, (click TEMPLATE > EDIT HTML), click inside the window ctrl+A and press the delete key, then copy the template from the relevant page of Stavanger's Forum, copy, and paste into the template editor window. Preview, and if satisfied, save.
Some sites uses a different method for changing to a different template. They have a link to an XML file instead. For such sites, right-click on the link, select "Save link as..." (wordings may be slightly different browsers), then save the XML file into a suitable place in your computer where you can find later. To change to the new template, in the Dashboard, click LAYOUT, then click EDIT HTML,

click "CHOOSE", then locate the XML file you just downloaded, and click "UPLOAD".
Other templates you can consider are:
New Blogger template modified by Stavanger
Dots New Blogger template with Header
New Blogger templates modified by Ramani
New Blogger templates by Isnaini
New Blogger templates by Thur
Ramani's New Blogger Neo template
New Blogger template by Final Sense (these have no navbar)
A blog reader commented requesting for more details and did quite a systematic summary of steps to backup New Blogger template PLUS Page Element to make sure that the instructions I gave him is safe to implement. Jamie of Goldfish Care Information has given permission to reproduce his summary which I will copy-paste below with some editing or addition of my own below:
1. Back up my blog (in a suitably named folder)
2. Back up page elements and in same folder as back up name accordingly for page elements
3. Link list will have to manually redo (alternative is to use HTML/Javascript Page Element and HTML hyperlink tags for your "Link List". You can get an idea of how to do it at the bottom of What a grateful blogger did for me without asking. In this case, you can save the Page Elements and would not need to redo your Link List from scratch when you change template).
4. Profile, Archives just simply add in later (from the LAYOUT)
5. Now that its all saved and backed up get template from Blogcrowds.com copy it, go into html editor in blogger and paste it.
6. It will then say widgets are about to be deleted, that will be okay now since I backed it up and saved codes
7. Click okay and save.
Backing up New Blogger templates has been made very easy. Only problem is some of your Page Elements may be deleted when you put back your backup or new template. That is why it is important for you to read the above post.
For backing up New Blogger template, all you need to do is to sign into your New Blogger account, click "Layout" in the relevant section of the list of blogs, click the TEMPLATE > EDIT HTML tabs. This will open the template editor window and you can make changes to the template if that is what you want to do. However, as mentioned above, it is important to backup the current template first before making changes or changing to new template.
To backup the template, click "Download full template" and save it with an easily identifiable filename like DummiesGuide 1 feb 2007 plus any other information to identify the backup template such as changes you plan to make, ect., and save it in a suitable folder. Make full use of the ability of using long file names. If you use the old method of backing up template by copy-pasting into Notepad, make sure that you expand the template widget first.
Note "PLUS Page Elements" above. Reason is, when you change a New Blogger template, some Page Elements (widgets) may be deleted. For more information on backing up Page Elements, refer to Backup Page Elements (widgets) (click BACK button to get back to this page)
If you want to change the current template to a standard Blogger template, click the TEMPLATE > PICK NEW TEMPLATE tabs and select a suitable template, then click "Save template". If you have done customization, it is likely you will get a warning that some Page Elements (widgets) are about to be erased, and whether you want to proceed.
If none of the standard templates appeal to you, there are other templates made or modified by others. This template uses Ramani's modification of Douglas Bowman Minima template (see 3 column template for the New Blogger (formerly beta). I choosed this template mainly because it fits in nicely for those using the 800x600 screen resolution which still represents 5 - 20% of the readers (this statistics is obtained by installing statcounter (those using the New Blogger template will install the statcounter by using "Add a Page Element" instead. Readers with larger screen will see empty columns on either side of the screen. Also there is this readability study which influenced me: What is the best template to use for my blog. See No. 2. However, template choice is a very personal matter, and people value different things, and also have different kind of visitors. You chose the template you prefer.
If you want to rid of those empty columns, there are other templates to consider. Use the standard Blogger stretched templates. Also, see New Blogger 3 column template modified by Stavanger of Blogcrowd Forum, More New Blogger (formerly beta) templates modified by Stavanger and New Blogger (formerly beta) template for posting large photos, tables, scroll boxes, etc.. To use these templates, get to the template editor, (click TEMPLATE > EDIT HTML), click inside the window ctrl+A and press the delete key, then copy the template from the relevant page of Stavanger's Forum, copy, and paste into the template editor window. Preview, and if satisfied, save.
Some sites uses a different method for changing to a different template. They have a link to an XML file instead. For such sites, right-click on the link, select "Save link as..." (wordings may be slightly different browsers), then save the XML file into a suitable place in your computer where you can find later. To change to the new template, in the Dashboard, click LAYOUT, then click EDIT HTML,

click "CHOOSE", then locate the XML file you just downloaded, and click "UPLOAD".
Other templates you can consider are:
New Blogger template modified by Stavanger
Dots New Blogger template with Header
New Blogger templates modified by Ramani
New Blogger templates by Isnaini
New Blogger templates by Thur
Ramani's New Blogger Neo template
New Blogger template by Final Sense (these have no navbar)
A blog reader commented requesting for more details and did quite a systematic summary of steps to backup New Blogger template PLUS Page Element to make sure that the instructions I gave him is safe to implement. Jamie of Goldfish Care Information has given permission to reproduce his summary which I will copy-paste below with some editing or addition of my own below:
1. Back up my blog (in a suitably named folder)
2. Back up page elements and in same folder as back up name accordingly for page elements
3. Link list will have to manually redo (alternative is to use HTML/Javascript Page Element and HTML hyperlink tags for your "Link List". You can get an idea of how to do it at the bottom of What a grateful blogger did for me without asking. In this case, you can save the Page Elements and would not need to redo your Link List from scratch when you change template).
4. Profile, Archives just simply add in later (from the LAYOUT)
5. Now that its all saved and backed up get template from Blogcrowds.com copy it, go into html editor in blogger and paste it.
6. It will then say widgets are about to be deleted, that will be okay now since I backed it up and saved codes
7. Click okay and save.
Sunday, January 21, 2007
Changing Templates
Backup Template
The first rule about changing templates is FIRST backup your current template. This is very easy to do in the New Blogger. Click the TEMPLATE > EDIT HTML tabs then click the "Download Full Template" link as shown in the screenshot below:
Save it in a suitable folder and use a filename like DummiesGuideToGoogleBlogger21jan07. So if anything happens, you can always go back to your previous template by first selecting the template you have downloaded by clicking the "Choose" button below the "Download Full Template" link, then clicking "Upload".
Changing Template
To change to a standard New Blogger template, click the TEMPLATE > PICK NEW TEMPLATE tabs, select a template you like by ticking the radio button against your choice. If you wish, you can preview it first (note that you can only do this if you have at least one post published). If satisfied, click "Save Template" (see screenshot below):
(TO BE CONTINUES)
Thursday, November 23, 2006
How to migrate a classic template to a beta template
Answering a reader of my blogs on how to revert from a classic template to a beta template:
Background: There are currently 2 versions of Blogger - the old Blogger (classic) and the new Blogger (previously beta). Bloggers who have been using the Blogger classic platform and have migrated to the new Blogger platform will still be using the classic template and will not have the new features of the new Blogger until they migrate their classic template to the new Blogger template. To migrate to the new Blogger template:
Sign into Dashboard
Click TEMPLATE in the extreme right of the relevant blog in the list of blogs
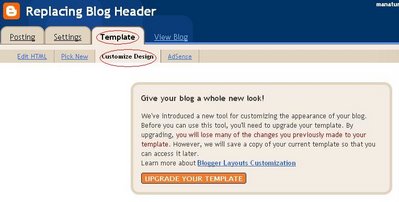
Click TEMPLATE > CUSTOMIZE DESIGN tabs
Click Upgrade your template
Pick new template
When satisfied, click SAVE TEMPLATE
See screenshot below (click screenshot to enlarge):
Background: There are currently 2 versions of Blogger - the old Blogger (classic) and the new Blogger (previously beta). Bloggers who have been using the Blogger classic platform and have migrated to the new Blogger platform will still be using the classic template and will not have the new features of the new Blogger until they migrate their classic template to the new Blogger template. To migrate to the new Blogger template:
Sign into Dashboard
Click TEMPLATE in the extreme right of the relevant blog in the list of blogs
Click TEMPLATE > CUSTOMIZE DESIGN tabs
Click Upgrade your template
Pick new template
When satisfied, click SAVE TEMPLATE
See screenshot below (click screenshot to enlarge):

Subscribe to:
Posts (Atom)


