Showing posts with label customization. Show all posts

Friday, July 03, 2009

Create or edit Blogger Profile


One of the feature of a blog is the blogger profile which is usually displayed in the sidebar if you choose to display the profile. When you first created your Blogger account, you would have chosen a display name and this will be reflected in the profile which will have minimal information.

If you want to edit your profile, first sign into your Blogger account to get to the Dashboard. At the top left, you will see a link EDIT PROFILE (see screen shot below):

edit Blogger profile

Click on EDIT PROFILE and you will be taken to the profile editor where you can edit whatever you want to be displayed in your profile.

If you want your profile to be displayed in any blog, click on the LAYOUT tab and select the PROFILE gadget.

Friday, February 13, 2009

Video tutorial: Creating a Blog List with Blogger


Transcript of Video Tutorial: Creating a Blog List with Blogger

Creating a blog list with Blogger. You might be asking yourself, what is a blog list? At its most basic, a blog list, also known as a blog roll, is a list of links to your favorite blogs in your sidebar. In addition, a blog list can also show you the date of each blog last update, or even the title and snippets of its most recent post.

It's really easy to add a blog list. First, log into your Blogger account and click the LAYOUT link. If you don't see a LAYOUT, you probably is using a old Blogger classic template, in which case you will see a TEMPLATE link. If this is the case, you'll have to upgrade to LAYOUT in order to use the blog list feature. You can do so by clicking CUSTOMIZE DESIGN from within your TEMPLATE tab. You will then be prompted to upgrade your template.

From your DASHBOARD, click the LAYOUT link. Then click ADD A PAGE ELEMENT (now called ADD A GADGET). Next, select BLOG LIST. You can then name your blog list and decide how you would like to sort and whether or not you would like a snippet of each blog lastest post to appear. You can always come back to change your settings later. Finally, click ADD A BLOG TO YOUR LIST to begin building your blog list. If you use Google Reader, an option will appear to import your subscription to your blog directly. Otherwise, enter the URL of the blog you like to link to. Keep in mind that you aren't limited to just blogs. You can add a link to any webpage to your blog list. However, please note that snippets will only appear for webpages with a valid RSS feed. If snippets aren't appearing, try adding the URL of the RSS feed directly. That's it, enjoy your blog list.

Video tutorial: Adjusting your Blogger privacy settings


Transcript of Video Tutorial: Adjusting your Blogger privacy settings

Hi, my name is Eric Case, and I am Blogger Product Manager. Blogger.com is a service that let people share articles, photos, videos, journal entries with each other on the web. And so we have a couple of settings that we are going to show you
will let .....
that you can see what you are writing about. To adjust the privacy settings for your blog, click the SETTINGS tab in Blogger. You will be taken to the first tab that is called BASIC. If you add your blog to our listing and set to YES, it may be linked from blogger.com when you update it, which can send visitors to your blog. If this is set to NO, it wouldn't be linked from Blogger, but it will still be viewable on the public web. If you don't want certain blogs in your Profile to be viewable from Blogger, click EDIT DISPLAYED BLOGS and uncheck the boxes next to the blogs you don't want others to see.

Now we have another settings that let you control how search engines like Google interact with your blog. The default settings for letting search engines crawl and index your blog is YES, but if you select NO, then automatically search engines should respect that preference, and your blog shouldn't appear in any search results.

Now even if you select your SETTINGS to not let your blog be linked from blogger.com or let search engines crawl it, people can still visit your blog by going to your blog URL. To control access to your blog URL, go to SETTINGS, then click the PERMISSIONS tab. Once you're there, you can choose whether ANYBODY, or ONLY PEOPLE I CHOOSE or ONLY BLOG AUTHORS can view your blog via its blog URL.

If you want to let your friends post to your blog as well as it, click ADD AUTHORS and add the email addresses whom you would like to rant permission to co-author your blog. Thanks for watching.

Video tutorial: Adding a Google Gadget to your blog


Transcript of video tutorial: Adding a Google Gadget to your blog

Do you know that there are tens of thousands of cool applications, tools and games you can add to your blog? They are called gadgets, and you can add them directly to your blog by browsing the gadget directory. To add a gadget, click the LAYOUT link from your Dashboard.

If you don't see a LAYOUT link, you are probably still using the old Blogger classic template in which case you will see a TEMPLATE link. If this is the case, you will have to upgrade to LAYOUT in order to add Gadgets. You can do so by clicking CUSTOMIZE DESIGN from within your template tab. You will then be prompted to upgrade your template.

From your LAYOUT tab, click ADD A GADGET to view the gadget directory. You are probably already familiar with the basic gadgets you can add to your blog. You can also access thousands of third party gadgets by browsing the different categories on the left sidebar (or use the search box to search for gadget).

Blogger Add a gadget directory

You can add anything from specialized local content to tools to make your blog more useful. You can even add ways to interact with your readers and games that your readers can play. Once you find a gadget you like, just click the plus sign plus sign Blogger gadget to add to your blog. Next, decide how you would like to customize your gadget and click SAVE.

You can now click and drag your gadget to change the position on your blog. You can even add your own creation to the gadget directory. If you have already created your gadget, click ADD YOUR OWN in the left sidebar of the gadget directory. You will then be prompted to enter the URL of your gadget. If you haven't created your gadget yet, but would will like to, there is plenty of documentation and help available online at code.google.com/apis/gadgets/

Sunday, January 18, 2009

Customizing with favicon (favorite icon)


All blogs using the standard Blogger template will have a little icon standard Blogger favicon in the address bar and also in the browser tab. The icon in the shape of a b for Blogger is the same for all blogs using the Blogger platform. That little icon is called a favicon which is short for favorite icon.

You can easily customize your blog to have your own favicon like I have done for mine where I use my profile photo as my own favicon to replace the Blogger standard favicon (see screen shot below):

Peter Chen favicon

If you want to have your own favicon for your blog, please refer to free favicon generator and host. If you have installed it using the instructions the but one fine day find it missing, refer to fix for "missing" favicon

Rather than doing a new post, I thought I would just refer you to posts I have already published rather than inventing the wheel. However, if you find the instructions I gave in the 2 posts above, please leave a comment and I will redo this whole article.

Sunday, January 04, 2009

Configure blog post


Previously (or now if you are still using the old classic Blogger template) to change configuration of the blog post, you will have to know CSS and HTML and you will have to edit the template. The New Blogger xml template has now made configuration of the blog post (comments, time stamp, etc.) very easy. All you have to do is to go to LAYOUT and click EDIT in the blog post section (see screen shot below):

configure blog post

You will get a pop-up window where you can change many things (see screen shot below):

configure blog post window

In the example above, I have changed the format of the date, change from "comments" to "feedback", etc. I have also dragged the Posted by (and changed it to just "by") and the comments (changed to feedback) to above the content of the post (see screen shot below):

dragged comments to above body of blog post

You can view the results of the change at Google AdSense channels report.

Sunday, June 15, 2008

Favicon generator and free .ico image host: Favicon for your blog

What is a favicon

Favicon is abbreviation for website icon. If you have not done anything to your blog template, the address bar of your blog may look like what you see below:

Blogger standard favicon

The favicon in the screenshot above is the standard Blogger favicon and this will be the favicon for all blogspot.com blogs by default. The favicon below is a photo of myself:

Peter Chen favicon

The favicon will also be seen in tabs of web browsers with tab browsing. See the screen shot below:

Peter Chen favicon in tab

If you want your own favicon, these are the steps to put your own favicon into a Blogger or any blog.

  1. Backup your template and backup the Page Elements

  2. Convert an image file (jpg, png, gif, etc.) into an image with a .ico extension. Google for "free ico generator" or try this one. It is the best I found so far:
    Dynamic Favicon for Blogger

    All you need to do is to sign up for a free account (I think if you don't want to, this may not even be necessary), click "browse" and select an image from your computer.

    Favicon .ico and code generator

    Upload, and that generator will not only generate the .ico image for you, at the same time it will host the .ico image on the web and give you the .ico image URL in the same page. In fact, it does better than that. It gives you the code for you to copy-paste into your blog template:

    favicon generator

  3. Go to Dashboard and get into the LAYOUT of the blog you want a favicon for. Click EDIT HTML and look for <head>. Update 29 October 2008: Refer to fix for "missing favicon" for the for the new position to put the script)). Paste the code you get from above and preview. If everything OK, click "Save" and your blog will have a favicon different from the standard Blogger favicon.

Thursday, January 25, 2007

Customizing your Blog

In the Old (Classic) Blogger, to customize (add stuff, change color or rearrange, etc.) your blog, you will have to get into the template editor, and to have some familiarity with HTML, and probably a bit of CSS (Cascading Style Sheet). With the New Blogger, you may get away with a little or no knowledge of HTML using the "Add a Page Element" and drag-and-drop in the Layout. To get to the Layout, you just click on "Layout" (circled in red) in the bottom right side of the section of the list of blogs in the Dashboard. See screenshot below (click to enlarge):
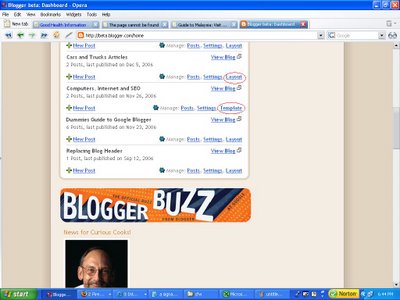
Blogger Beta: using a classic template or a beta template

If you see "Template" instead of Layout, that means you are still using an old classic template, and to get the Layout, you will have to migrate to the New Blogger template by clicking "Template", then "Customize Design" and select a suitable template.

On clicking "Layout" you will get a pop-up window with 12 choices - List, Link List, Picture, Text, HTML/Javascript, AdSense, Feed, Labels, Logo, Profile, Blog Archive and Page Header. Some like the Page Header, Blog Archive and the Profile may have already been added to the blog. See screenshot below (click to enlarge):

New Blogger Add a Page Element pop-up window

We will start with what I think will be the most commonly used first:

Link List Page Element

This is at the top right of the screenshot above, and is usually added to the sidebar. To add this, click on "Add to blog" and a pop-up will appear with various fields for you to fill in. Full description on how to add a Link List is given here: How to add a Link List to the sidebar (click "BACK" button to get back to this page).

HTML/Javascript Page Element

This is another commonly used widget. You use to add HTML or Javascript for AdSense ads, referral buttons, searchbar, visitor counters, guest books, shout box, etc. that you can get from various Websites. You generate the scripts in those sites, copy, click on "Add to Blog", paste the script into the opened window, then click "Save to blog". Once you have done that, you will see a new Page Element titled "HTML/Javascript at the top of the section (usually the sidebar). You can preview it by clicking "Preview" at the top of the Layout: Blogger beta: save layout. If satisfied, just click "Save". If not, you can move your cursor over the HTML/Javascsript Page Element and the cursor will change to a cross. You can drag and drop the Page Element into whatever position you fancy, preview, and if satisfied, click "Save".

Note that you can put more than 1 HTML tags or Javascript in the Page Element. You can also add in some text like at the top of the post of this blog. In that Page Element, I have added the script for the Google searchbar, the HTML hyperlink (CONTENT) and some short text on how to navigate the site.

If you want a hit (visitor) counter to track visitors to you blog, I recomment statcounter, from which you can gather lots of statistics about your visitors like from where they originate, their IP addresses, the operating system (Windows, Linux, etc.) and the screen resolution they are using, the keywords/phrases they used to find your blog, etc. In the case of a visitor counter, the more likely place one would place it would be at the bottom of the page, in which case to add the script, you will click "Add a Page Element" in the section for the footer.

Labels Page Element

You may add a list of labels (tags or categories) that you have applied to your posts. There is nothing much to do here. The title Lables is already added for you. Just click "Add to blog" in the Labels section, and the list of labels will be added to the section where you click "Add a Page Element (usually in the sidebar section). If you like the list to be under a different title, (for example Categories), replace that with Categories in the title field before you click "Add to blog". This is a useful list which can help your visitors find topics they are interested in, and should be added.

Picture Page Element

You may want to add some pictures to your sidebar, or to the Header. (for adding image to the Header, refer to Adding an image to your New Blogger blog Header where details of how to add clickable pictures and unclickable pictures in the Header are given).

To add pictures to the sidebar, in the section for Picture (second on the left) click "Add to blog" and this pop-up (Configure image) will appear:
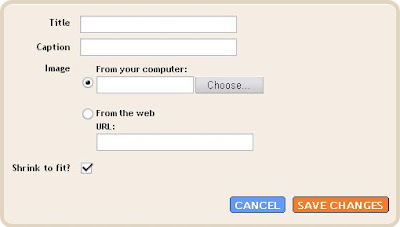
New Blogger configure image widget

If you have the picture stored in your computer click "Choose" and select the relevant picture. If you have a picture already hosted on the Web, tick the "From the Web" radio button and type or paste the picture URL. The "Shrink to fit is ticked by default. If you want the picture to appear in its actual size, then untick this radio button, but you must make sure the width of the picture do not exceed the width of the sidebar. If you want a title and/or caption for the picture, type it in the relevant field. Click "Save changes" and the picture will appear at the top of the sidebar section in the Layout. As described above, if this is not the position you want, drag and drop this Picture Page Element to the position you want, preview, then save if satisfied. This will produce a non-clickable picture in the sidebar.

If you want a clickable picture, refer to the bottom half of this post: How to put a clickable picture in the sidebar.

List Page Element

This List Page Element is the first left item in the "Choose a Page Element" pop-up. It just allow you to add a list of items, for example a list of books. The list is not clickable. For an example, have a look at this blog Good Health Information. The list of books is near the bottom of the left sidebar, just above the Profile.

Text Page Element

This Page Element is the second right Page Element in the "Choose a Page Element" pop-up. It just allow you to add some text to the sidebar or to any section (header, above the post, etc.). For an example, see Good Health Information. The text is some quotation on Health at the bottom of the right sidebar. Although it says "TEXT", you can include limited HTML tags such as hyperlinks like what you can see at the top of the posts in this blog Earning Online. You will see a hyperlink Text Link Ads which is a referral link. The "Configure Text" pop-up is almost like your post editor with icons to make text bold, italic, change color, and a hyperlink icon
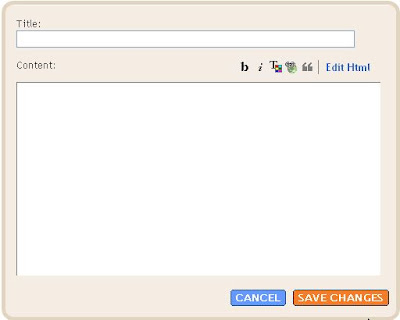
Configure text Page Element

Feed Page Element

This Page Element is the fourth right in the "Choose a Page Element" pop-up. This allow you to add Atom or RSS (Really Simple Syndication) feed to your blog. For an example, see Computer and Internet Articles. You will find the RSS feed for the blog Blogger Tips and Tricks. You can see it near the bottom of the right sidebar, just above the Profile. The feed URL I added was http://blogger-tricks.blogspot.com/rss.xml

Logo Page Element

This probably will be one of the least used Page Element. All it does is to add a Blogger logo to your blog. For an example, look at this blog: Blogger Articles. The Blogger logo is right at the bottom of the right sidebar, just below the Profile (About Me). You have a choice of logos (see screenshot below):
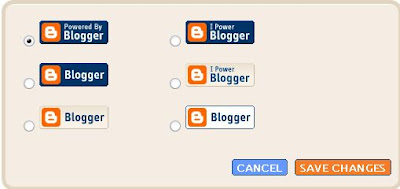
New Blogger choose logo pop-up

AdSense Page Element

This Page Element is the third right in the "Choose a Page Element" pop-up. With this Page Element, you can add Google AdSense ads to your blog without having to log into your AdSense account. Although I have an AdSense account, I never use this Page Element because it allow me to only add ads, and give me limited flexibility and choice. I can't add referral text or buttons, or Google searchbar. Futher, for the ads color, I only have 9 choices, blend the ads or eight other ready color pallette. In AdSense account, I can generate scripts for ads, add and edit color palattes, add referral buttons and Google searchbar like those you see in this blog. You can actually apply for an AdSense account via this Page Element, and AdSense will serve PSA (Public Service Ads) until your application is approved. If you are interested in applying for an AdSense account, it is my hope that you will apply by clicking on the AdSense text referral at the top of the right sidebar that reads "Generate revenue from your website. Google AdSense".

You can also get help on adding Adsense products from Generating Revenue from your Website. In particular, for generating ads and search boxes and blending their colors to the colors of your site (recommended by AdSense), refer to

Generating script for your AdSense for Content ads

Blending the colors of your AdSense ads to the colors of your site

Generating script for your Google search box

Blending color of your Google search box to the colors of your site